Homemade Gunpowder for Long Term Survival

By Plan B Writer’s Alliance – http://www.LocustsOnTheHorizon.com

(This article is adapted from the book ‘Locusts on the Horizon‘ from the chapter titled ‘Powder’. )

In our 1187 page, 247,000 word book, Locusts on the Horizon, we have a 409 page Defense section where we go into depth about all aspects of firearms, including selection, history, reloading, home powder manufacture, bullet casting, real world terminal ballistics of common calibers, and many other topics.

AN UNCERTAIN SUPPLY CHAIN

As we watch the world we grew up with getting more precarious and uncertain by the day, one thing that most preppers can accurately assume is that at some point, ammunition and reloading supplies stand a very high chance of becoming much harder to obtain. If things get bad enough, either by the halting of manufacture, or by oppressive government regulation, at some point people will have to improvise.

While weapons such as a crossbow, or a bow and arrow have their place in the grand scheme of things, there is still no substitute for firearms. Even the Native Americans, experts with the bow and arrow from childhood onwards, recognized this from the first moment they encountered firearms and they quickly did everything they could to upgrade.

The three expendable components of firearms ammunition that people will, at some point, have to start making their own fresh supplies of are an ignition source (primers, caps, flint), a power source (powder), and a projectile (bullets, shot, slugs). If there is anyone one of these you can and should horde a ridiculous amount of are primers, as they are the hardest to fabricate.

POWDERS

In this article we will be discussing the manufacture and use of homemade powder for use in firearms ammunition. There are two types of powder, traditional gunpowder, and ‘smokeless powder’.

For those who are new to this subject, traditional gunpowder is the old stuff, typically called ‘blackpowder’. This is a simple mix of saltpeter (potassium nitrate), sulfur, and charcoal. It’s an explosive mixture, and modern fire codes also consider it as such.

NOTE: Check zoning and fire codes for maximum legal amounts of smokeless powder and blackpowder you can have in a residential home. Blackpowder, being an explosive, usually has a more restrictive quantity limit than smokeless. Common sense dictates that you never store your powder next to your supply of primers, just as an added measure of safety.

The newer stuff is ‘smokeless powder’ (new as in 1890’s). Smokeless powder is not merely a mixture of components like blackpowder is. It is a chemical compound, a nitrocellulose based propellant, though highly combustible, is not actually classed as an explosive the way blackpowder is.

When compared to blackpowder, smokeless powder offers far less smoke, far less fouling, between two and three times the power (depending upon the powder brand), and subsequently higher velocities, in addition to much higher chamber pressures. While blackpowder is measured by volume, smokeless is carefully measured by weight.

Different blackpowders generally only vary in the fineness of the flake size (the corn size) and the quality of manufacture. Regardless of that, blackpowder is still just blackpowder, with the same ingredients in the same proportions.

Smokeless powders, however, are all different blends, each of which are formulated as per their intended use. Different smokeless powders are made specifically for pistol cartridges, others specifically for rifles, and others specifically for shotguns. Because shotguns and pistols are both low pressure types of rounds (a 12 gauge shotgun shell has about half the chamber pressure of a .22LR rimfire round), some smokeless powders are dual use, intended for use in either pistol or shotgun ammo.

In the interest of long term survival, one of the key differences between the two types of powder is that your average person can make blackpowder. In a pinch it can be made at home (preferably outside the dwelling).

Making smokeless powder is another matter altogether. In order to make smokeless powder properly, and without a high risk of killing those making it, you need someone who is a professional grade chemist with the proper equipment to support the operation.

NOTE: These days, blackpowder weapons are still in common use, and there are blackpowder substitutes available such as Pyrodex. However, that is irrelevant to the current discussion since Pyrodex and other blackpowder substitutes, while some ingredients are public knowledge, they all typically involve a proprietary formula, not an ancient, well known formula like blackpowder.

USING BLACKPOWER IN A MODERN FIREARM

Blackpowder was the fuel for muzzle loading weapons for centuries. Cartridges were loaded with blackpowder from around the end of the US Civil War up until the mid to late 1890’s, which was about 30 years.

So, can you use blackpowder in a modern weapon?

The general rule of thumb is that you should never use smokeless loads in a weapon designed for blackpowder loads. However, a modern firearm designed for smokeless powder can typically take almost any blackpowder load, provided that the blackpowder has been loaded properly into the cartridge. Modern weapons designed to use smokeless powder are designed to handle powder that has between two and three times the power of blackpowder.

Keep in mind, though, that blackpowder is extremely dirty and really leaves a lot of residue, plus it burns really hot and the pressures are typically lower than smokeless. Using blackpowder in a semi-auto like an AR-15 isn’t really a good idea. There is a good reason that auto-loading weapons really didn’t start to take off till after smokeless powder came out in the 1890’s. So, lever actions, pump actions, bolt actions, and break actions are probably your best bet if you have to start using blackpowder.  For reliable use in handguns, revolvers are the handgun of choice when using blackpowder, not semi-automatics.

Something to always remember about using blackpowder in cartridges is that you cannot leave empty airspaces in the cartridge case. If you will notice, cartridges either designed in the blackpowder cartridge era, or were based upon cartridges from that era, tend to not have steep shoulders. They tend to either be straight walled or with gradually sloped shoulders. This makes them easier to properly load the case with blackpowder.

One very popular modern rifle cartridge that has a blackpowder cartridge in its ancestry is the .30-30 Winchester. The .30-30 was the very first purely smokeless cartridge sold in the USA (1895), and the .30-30’s “parent case” was an older blackpowder caliber. Two legacy handgun cartridges from the blackpowder era that are in common use today are the .38 Special and the .45 Colt, both of which were originally loaded at the factory with blackpowder. Some legacy rifle cartridges from the blackpowder era, originally loaded with blackpowder, which are still popular are the .45-70, the .303 British, and 7.62x54R.

One very common cartridge that is a hold-over from the blackpowder era is the 2-3/4” 12 gauge shotgun shell, which is probably the most common centerfire caliber in the USA. The length of the 2-3/4” 12 gauge shotgun shell itself is a direct legacy of the extra room needed for a charge of blackpowder (3” shells were not offered for sale in the USA till the 1930’s).

Because of the lower chamber pressures and velocities, the 12 gauge shotgun, and other gauges as well, are typically the one class of ‘modern’ cartridges where you really don’t lose much, if any, ballistic performance in most loads if you have to revert back to using blackpowder. This is provided, of course, that your powder is well made and you load the shell properly. Because blackpowder burns very hot, older plastic shells often wouldn’t last more than one or two uses with blackpowder, but the better plastic in most current shells does a much better job.

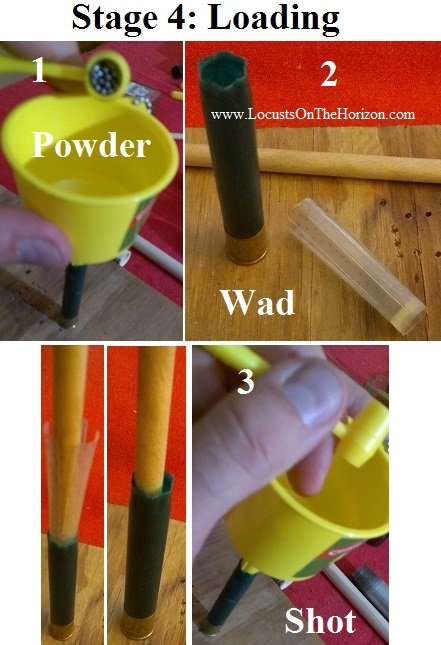
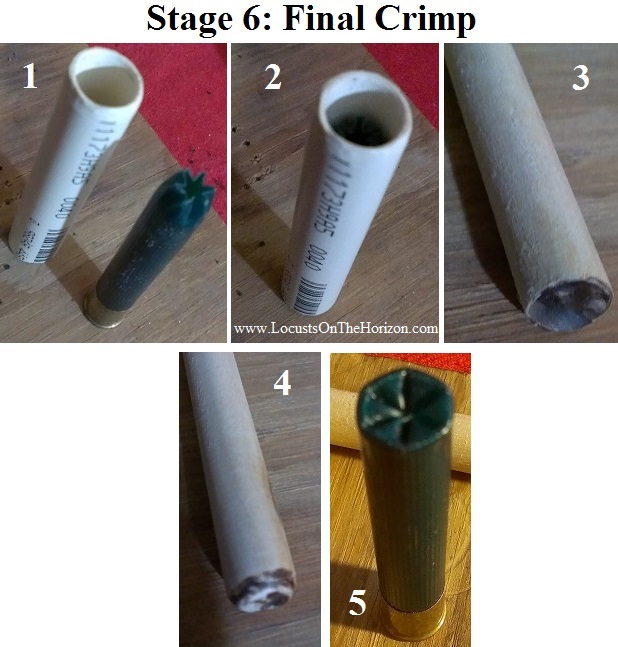
As we have stated, whether you use it in a muzzleloader or in a cartridge, blackpowder cannot be loose, such as what is often the case with smokeless. If you leave it loose, you can get a catastrophic failure. You fill the case, tamp it down, and you compress it a tad when you seat the bullet. One old time guide is to fill the case 1/16″ past the point where the bullet will seat and then compress the powder when it seats. With a shotgun shell, you tamp the powder charge down then seat the nitrocard or the plastic wad and tamp it into place.

Consult a reloading manual, of course, before you do any reloading. One of the benefits of the popularity of cowboy action shooting and blackpowder metallic cartridge shooting is that there is a lot of current, up to date knowledge floating around about reloading cartridges with blackpowder.

MAKING BLACKPOWDER

Making blackpowder yourself for use as gunpowder is not something we endorse and you do so at your own risk. You will also usually void all warranties on any firearm when you do this. Use common sense and caution. We give information on it for educational purposes only. In our opinion, making your own blackpowder is best left for times of extreme austerity or prolonged shortages of ammo on the retail market.

That said, the ability to manufacture blackpowder means people can retain the capability to hunt and defend themselves with firearms almost indefinitely.

The three main ingredients are potassium nitrate (saltpeter), charcoal, and sulfur. The formula for blackpowder is 75% potassium nitrate (5 parts), 15 % charcoal (one part), and 10% sulfur (2/3 of 1 Part). These percentages are percentages by weight, so you will need a scale. Most people probably won’t be making huge amounts, so a small, inexpensive digital scale will work. For best results, your measurements should be as precise as possible.

These ingredients are commonly available at hardware and garden stores like Home Depot and Lowes, and generally they are not that expensive. You can also often find the ingredients at your local pharmacy, such as ‘saltpeter’ and ‘flour of sulfur’.

For an example of garden department blackpowder making supplies, stump remover, such as the Spectracide brand, is generally about 99% pure potassium nitrate. Lilly Miller Garden Sulfur is 90% sulfur and 10% anti-caking agent.

Real hardwood charcoal, not charcoal briquettes, is best. Pound the charcoal to small bits, such as with a mortar and pestle, and then powder it. An electric coffee grinder or something similar generally works well for this.

One key step in the process that many people miss when making blackpowder is that they don’t mill it.

The speed at which a given batch of blackpowder burns is a good indicator of its quality. For use in a firearm, you want a powder that burns as fast as possible. You get this by milling.

When in loose, fine powder, like you find in a firecracker, blackpowder is in a form called ‘serpentine’. Milling is where, after mixing, the serpentine powder is put into a tumbler made of a non-sparking material with heavy, lead balls and tumbled for several hours. Home gunpowder makers often use an inexpensive, hobby grade rock tumbler for this.

Blackpowder is a mixture, not a chemical compound. Because of this, you need milling to press the ingredients together tightly. The longer the powder is milled, the tighter the ingredients in the mixture are pressed together, and the faster the mixture burns when ignited. You can pour out two lengths of powder, one milled and one not milled, and then light them off. You can see the difference in the burn rate.

After you mill the powder for about six hours, you need to add a binder to assist in the flaking/corning process. You calculate what 5% of the mass would be of the weighed ingredients you have in the powder mix, and you add that much ‘dextrin’ to the powder while it is still in the mill. You then mill the powder for about 20 more minutes with the dextrin in the mix.

Dextrin is made well in advance of any powder making by spreading ordinary corn starch out thin on a pan or a cookie sheet, and baking it at 400 degrees Fahrenheit for three hours.

After the milling is done, the next step is the corning/flaking process. Blackpowder is typically graded on how finely flaked it is. Homemade gunpowder on the frontier was often not ‘corned’ and was used in serpentine form. Serpentine, however, does not provide optimal performance.

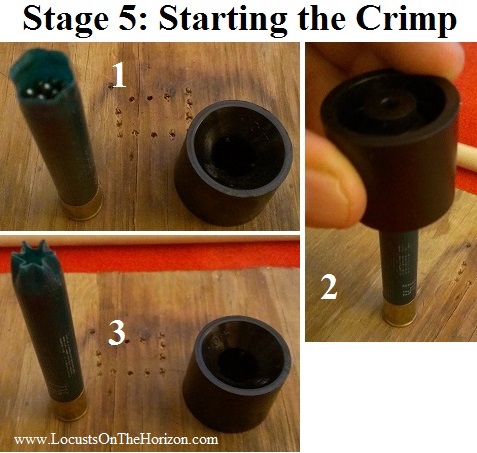
For proper blackpowder intended for use in firearms, for the best performance it needs to be ‘corned’ (flaked). A common way this is done is to get the serpentine style gunpowder soaked in alcohol and then grated into granules on a screen over something to collect it, such as a piece of newspaper, then allowed to dry.

It can be then sifted and graded as to the flake size. Large ‘F’ would be for things like cannons, and finer flaked powder like ‘FFF’ would be for pistols. Often, homemade powder is just used without sorting out the different sized flakes.

It doesn’t take a huge amount of ingredients to make enough blackpowder to load quite a few shotgun shells and handgun cartridges. One simple batch can give you plenty for most self-defense needs and for hunting.

For example, a typical 2-3/4”, 12 gauge shotgun shell load will be a 3 dram blackpowder charge. A common blackpowder load for a .45 Colt used nowadays is 35 grains of blackpowder. Current blackpowder load data for .38 Special shows a load of 18 grains of blackpowder.

A one pound container of Spectracide stump remover sold at Home Depot is about $7.30, as of 2013. That one pound of stump remover is pretty much pure potassium nitrate and is 75% by weight of the blackpowder mix.

This means that one pound container of stump remover, when combined with the other blackpowder ingredients, including the extra 5% of dextrin, will make 22.4 ounces of blackpowder, or 358.4 drams. When measured in grains, at 7000 grains per pound, that would be 9800 grains of blackpowder.

So, that one pound of stump remover should produce enough homemade blackpowder to reload 119, general purpose, 12 gauge 2-3/4” shotgun shells with a 3 dram charge. It can also reload 280 rounds of .45 Colt ammo, or 544 rounds of .38 Special ammo.

If times are tough, that much ammo can make a significant difference between living and dying.

LINKS

One of the YouTube Channels which we like is from a man who goes by the name ‘Brushhippie’.  Brushhippie makes his own corned blackpowder to use in his old fashioned firearms. He has a couple of good videos that shows his basic process and he makes some very fast powder. His process which he sets up outside is simple, portable, and practical. Before you attempt to make any blackpowder, watch his videos.

‘Making Blackpowder’ by Brushhippie

Part 1 http://www.youtube.com/watch?v=fKB8c4VLbw0

Part 2 http://www.youtube.com/watch?v=AUVo_hOadyc

© Plan B Writer’s Alliance – Permission to copy and reprint this article is given so long as reference to the original author and the website http://www.locustsonthehorizon.com are mentioned.

book cover small

‘Locusts on the Horizon’

Homemade .410 Reloading Kit

By Plan B Writer’s Alliance – http://www.LocustsOnTheHorizon.com

(This article is adapted from the book ‘Locusts on the Horizon‘ from the chapter titled ‘Homemade Reloading Kits’. Step by Step instructional photos at the bottom of the article.)

In our 1187 page, 247,000 word book, Locusts on the Horizon, we have a 409 page Defense section where we go into depth about all aspects of firearms, including selection, history, reloading, home powder manufacture, bullet casting, real world terminal ballistics of common calibers, etc. In one of the chapters in that section, ‘Homemade Reloading Kits’, we show you how to make both a 12 gauge and a .410 gauge homemade reloading kit for shotgun shells.

The 12 gauge was an obvious choice because it is the most popular centerfire cartridge in North America, but why the .410?

The .410 is a favorite amongst homesteader types and others. Like the .22LR, the .410 is ‘just enough’ in skilled hands to do a wide variety of tasks. Unlike the .22LR, it’s reloadable and in experienced hands is reliably good against birds in flight as well as ground targets. It’s also extremely stingy on powder usage, with typically between 540 and 580 reloads per pound of powder. It’s low recoil also makes it handy for smaller people and youths. Even for those with a minimalist battery, having an inexpensive, single shot .410 around for both general foraging and bringing people’s skills with a shotgun up to speed makes a lot of sense for long term sustainability.

Shotgun ammunition is the easiest of all of the different types of modern centerfire ammunition to reload using homemade and scavenged tools. In this article we will show you a homemade .410 reloading kit. This kit uses the standard fold crimp that modern, plastic shotgun shells typically come from the factory with. This kit will also resize the metallic shell bases on plastic shotgun shells like a regular reloading press will. This kit will work on either 2-3/4” or 3” long .410 gauge shotgun shells.

This method of shotgun ammo reloading is very similar to how shotgun shells were loaded 100 years ago, with the exception of plastic shells and a more modern fold crimp. Our fold crimp reuses the original factory fold crimp in a manner similar to the small ‘Lee Loader’ kits which Lee Precision made for shotgun ammunition years ago, but no longer manufactures. The old, no longer produced Lee Loader kits for shotguns are now in such demand that as of early 2013, if you can find one on eBay, they are being scalped for sometimes $100 or more.

The Lee Loader kits and the other old style of shotgun reloading tools are not that complicated. By replicating these tools using materials and components which are currently and commonly available, people can create for themselves a method to reload shotgun ammunition that is very compact and fairly inexpensive.

While not a substitute for a full size factory made reloading press, especially if you will do reloading in large volume, these can allow you to reload ammo in situations where you cannot obtain a factory made reloading press.

Our homemade .410 shotgun shell reloading kit uses small parts and tools we bought at the hardware store, bought online, and some we found already on hand. This .410 gauge reloading kit can generally be put together for about $20 – $25, or less, depending upon what you already have laying around the house.

DISCLAIMER: This kit we made for ourselves and are showing for educational purposes only. Attempt this at your own risk and your own responsibility. For a project like this always use common sense, don’t smoke or be near open flame while doing this, always wear eye protection, and always use caution at every step. Do not do any project like this near your children or anyone without eye protection.

Always consult a reloading manual for proper load data. Use a precise reloading scale or measured scoops for measuring out the proper amount of powder and shot.

NOTE: Empty shotgun shells are properly called ‘hulls’, but we often use the term ‘case’ here interchangeably for clarity’s sake for most shooters.

THE .410 RELOADING KIT – COMPONENTS & USE

410_reloading_kit

 .410 Reloading Kit Components

The .410 kit pictured in the photo has the following numbered components. The components bought online have an * before them. The rest of the components were either found already on hand or bought over the counter from the local ACE Hardware.

1)      PVC water pipe, 1/2” diameter, 3-1/2” long, beveled internally at the ends.
2)      Galvanized pipe nipple, 5/8” interior diameter
3)      Wooden dowel rod, 1/2” diameter
4)      Wooden dowel rod, 1/4” diameter
5)      3/8” drive socket, old cheap one made in Taiwan
6)      * 410 bore Resize Ring from a MEC 600 reloading press. MEC Part#: 8465410
7)      Magnetic bit holder for an electric drill, 3/8” diameter, two of them attached together.
8)      * Lee +374 De-capper, from a .45-70 Lee Loader kit. The 3/8” Drywall Anchor Tool we found at ACE Hardware can substitute.
9)      * 410 bore ‘Spindex Star Crimp’ – 6 point, from a MEC 600 reloading press. MEC Part#:    8439410
10)   Funnel, any funnel will work so long as the tip will fit inside the mouth of the .410 shell case.
11)   Scavenged wood and a piece of scavenged steel, something hard to hammer on and protect the table.
12)   Hammer, plastic tipped

This .410 gauge reloading kit has the ability to resize the steel base and do a six fold crimp. The Spindex Star Crimp component from a MEC 600 reloading press serve the same exact purpose that the handheld ‘starting crimp’ tool did in the old Lee Loader kits, and is, in fact, almost identical to it in function and size. There is only one style of Spindex Star Crimp made by MEC for the .410, a 6 point, but pretty much every .410 round with a factory fold crimp uses a 6 point fold crimp.

For the .410 kit, we dispensed with the wad guide as it didn’t help like it did in the 12 gauge kit, and was in fact a hindrance, oddly enough. The only wad guides available for the .410 were MEC and they don’t fit the end of plastic pipe or copper tubing as well as those from Lee, which is what we used in the 12 gauge homemade reloading kit with it’s copper loading tube.

We’ve also dispensed with using a loading tube for the .410, and we put the funnel directly into the mouth of the shell case. The PVC tube is simply for holding the loaded shell during the final fold crimp to prevent deformation of the plastic body of the shotgun shell hull during the fold crimping process.

We found a 3/8” Drywall Anchor Tool at ACE Hardware, similar to the 5/8” one we used as a de-capping rod in the 12 gauge kit, and it was small enough to use in a .410 shell case. It was built like it was specifically made to be a .410 de-capping tool. However, the .45 caliber de-capping rod from a Lee Loader kit was already ordered and it works like a champ. Like with the 12 gauge kit, the old, spare socket is the de-capping base. A large nail will also work as a de-capping rod, but the .45 caliber de-capping tool and the drywall anchor tool essentially self-align themselves in the empty .410 shell case and they work well with the resizing procedure whereas a nail will not.

The ‘Galvanized pipe nipple, 5/8” interior diameter’ is for use with the resizing die. After the .410 hull is de-primed, but before is is re-primed with a fresh primer, you place the resizing die over the end of the pipe nipple, and with the plastic tipped mallet you gently whack the .410 hull into the hole in the die. You then flip the die with the hull in it over, put the de-capping rod into the hull, and gently whack the hull out of the die. The metal base of the hull is now resized. Shotgun shell hull bases are steel. Even when the bases if a hull look like brass, they are still steel, just plated

Like all shotgun shells, the .410 has the tip of the seated primer protruding into the case body, above the floor of the interior of the shell case. This means that like other shotgun shells it needs a hollow priming rod that is still strong enough to take multiple hits from a plastic tipped mallet. Due to the smaller diameter of the .410 shell case we could not use the shaft from the multi-tip screwdriver. What we found that did work well was a pair of magnetic bit holders for an electric drill. We used two so they would be long enough, and their magnets held them together.

The scavenged wood and scavenged piece of flat steel are the same as used in the 12 gauge kit and they serve the same purpose. Bothe of the kits we made store in the same small box.

The smaller diameter, ¼” section of wooden dowel has one end slightly beveled to ease insertion into the shell and the wad. This tool is mainly used to insert the plastic wad and push it firmly into place.

The 1/2” diameter wooden dowel rod has been shaped at each end to be the tool which establishes the final fold crimp in two stages. One end of the rod is shaped like a bowl for the first stage of the final crimp, the other is flat with beveled edges for the second stage of the final crimp.

After the Spindex Star Crimp tool is used to start the crimp, the shell is placed into the tube to prevent deformation. The tube is slightly beveled on the inside at the end where the shell inserts. This is to make extraction of the loaded and freshly crimped shell from the tube much easier.

After the shell is inserted into the tube, the bowel end of the rod is used to pinch the crimp further closed, and then the flat end with beveled edges is used to push the pinched fold crimp into place. Do not hammer this. Just a simple push of hand pressure will work. After all, it’s just plastic you are pushing on.

This kit is designed so that the only hammering is done during the de-capping, resizing, and re-priming operations. No hammering is done on a live, loaded shell. The scavenged piece of flat steel is only for placing the primer on for re-priming. The flat metal should not be used for anything else. Use the wood, or a piece of cloth over the wood, for setting the base of the primed shell on during the rest of the reloading process. Make sure no spilled shot is left sitting on the wood. You don’t want anything small and hard under a live primer.

If, somehow, you get any slight mushrooming at the crimp end of the shell, the loaded shell can be rolled into proper shape against the edge of a hard surface, like a table top, sort of how they do when they make a cigar.

At the factory, they often make sure their fold crimps don’t come undone by roll crimping the loaded shell after fold crimping. If you have a roll crimping tool, that can come in handy for this. However, that is usually a bit of overkill for the home reloader.

Here are photos of the stages of reloading a .410 shell with the kit we put together.

410_decap_and_resize

410_repriming

410_loading

410_starting_the_crimp

410_final_crimp

© Plan B Writer’s Alliance – Permission to copy and reprint this article is given so long as reference to the original author and the website http://www.locustsonthehorizon.com are mentioned.

Spotting Game

By Plan B Writer’s Alliance – http://www.LocustsOnTheHorizon.com

(This is an excerpt from the book ‘Locusts on the Horizon‘ from the chapter titled ‘Hunting’.)

Most game in the USA, which is shot with a firearm, is killed within 200 yards or less of the hunter, generally much less. The reason for this is that terrain, trees, and other things simply block your line of sight. Game is also very good at hiding and not being seen, which for them is instinctive, something which humans have to practice at doing. Spotting game is something of a lost art in this country which only a few still do well. Most hunters, even avid ones, tend to generally spot only a fraction of the wild game in their area, even the larger game such as deer.

In order to be good at spotting game, you need to be quiet and learn to use the terrain and natural lighting (which changes as the day goes on) to your advantage. Be patient, don’t be in a hurry. Game most often spots you by your movements, and often you spot game by its movement, so don’t be in too much of a hurry.

Modern people often don’t realize just how loud they really are. They talk, they loudly sneeze, and they walk through the bush like a herd of elephants. If you want to spot game, you are going to have to learn not to do that.

Be quiet, stop, close your eyes for a minute and listen to the world around you. Now you have a guideline to go by as you do not want to interrupt that natural background noise you just tuned in to.

You will learn to always keep on the lookout for signs of game animals, no matter what you are doing. It’s very good practice. In areas you plan to hunt, take some time out, be patient, and just be quiet, be still, and just watch. You will be amazed at what you can see.

Be aware of where you are stepping, take your time. One old trick of the Native tribes on walking quietly is to step with your heel down, roll your feet along the outside edge, then apply pressure to the front of your foot as you take the next step. Practice this and you might be surprised at just how quiet you can walk when you get accustomed to it.

Unless it’s really cold and there is snow on the ground or it’s really wet and muddy, a pair of moccasins, or a pair of Sperry ‘Top Sider’ boat shoes (basically, moccasins again), or something similar helps you feel the ground and things beneath your feet before you loudly stomp on them. Due to customer demand, LL Bean just changed the formula in the soles of their Maine Hunting Boot to give the hunter greater feel of the ground, the way they used to. Many hard core hunters, especially some hard core rural bow hunters, will often bow hunt barefoot if the weather permits.

Women are dynamite for spotting game. Often if the man is the primary hunter of the family, he and his wife or significant other, or a daughter that is old enough, should learn to hunt as a team, especially when hunting larger game like deer. If you have only one pair of binoculars, or only one pair of large binoculars, have her use them. He’s the shooter; she’s the spotter, like a sniper team.

The reason for this is that men and women literally see the world differently. The way a woman sees and how her brain interprets the images her eyes send is a bit different than how it works in a man. This is a scientific fact. Women are normally much more tuned to colors and to patterns than men are. Women tend to see shades of colors and patterns more acutely than a man does. Camouflage does not fool a woman’s eye as readily as a man’s. Game doesn’t fade into the background as readily in the eyes of women as they do with men’s eyes.

One thing we suggest but we also mention in the Trapping chapter is how to do a quick game census of the area. Leave every firearm you have at home in case fish and game officers pull you over when doing this, so you won’t be considered ‘poachers’.

Take a powerful spotlight or a really powerful flashlight, and shine it in an area at night, catching the game by surprise. You might be stunned at how much is out there, especially pigs and deer. Another way to do this is to just sit still and quiet at night in a hide, or a tree stand, or even your car with the windows down. Then with a pair of 50mm binoculars just start watching for animals and movement.

© Plan B Writer’s Alliance – Permission to copy and reprint this article is given so long as reference to the original author and the website http://www.locustsonthehorizon.com are mentioned.

Amazon Update

Due to updates done before the launch of on-air ads for the book on the Alex Jones Show, we are requesting a ‘push’ by Amazon so that all previous purchasers of ‘Locusts on the Horizon’ will be given free updates to the book.

Mad Max and EMP

By Plan B Writer’s Alliance – http://www.LocustsOnTheHorizon.com

(This is an excerpt from the book ‘Locusts on the Horizon‘ from the chapter titled ‘The Matter at Hand’.)

In recent years, the fans of the Mad Max scenario have latched upon a new spontaneous, universal, obliteration threat for civilization. This is the ‘grid down’ scenario caused by either an EMP attack or a geomagnetic storm launched by the sun.

Nowadays you hear many pundits talking at length about how there is a ‘government report’ which states that after an EMP attack, a whopping 90% of the US population will be dead in 18 months. This has some in a state of near panic.

The problem with this is that the main ‘reports’ about this  being touted nowadays don’t come from the US government, but rather a ‘neo-con’ think tank called the Center for Security Policy.

The Center for Security Policy, founded in 1988, is a lobbying group of politically well-connected Washington insiders, and it is funded with about $4 million per year from several foundations which have political agendas, plus donations from numerous military weapons contractors, such as Boeing, General Atomics, General Dynamics, Litton, Lockheed Martin, Northrop Grumman, Thiokol, and TRW.

In other words, they are a lobby and a mouthpiece for the ‘military industrial complex’ which Eisenhower warned us about so long ago.

A primary goal of the Center for Security Policy in the last few years has been to promote the starting of a pre-emptive war with Iran. One of the tools they have used to try and sell this new war to the public is scare tactics with EMP as a doomsday device, and the supposed threat of the Iranians attacking the US with it.

The founder of this think tank (who is paid $300,000 per year) and its main driving force is a man named Frank Gaffney.

Frank Gaffney is one of the 25 signatories of the June 3, 1997 “Statement of Principles” of PNAC – Project for a New American Century, and is a neo-con ‘war hawk’ who has called for, and continues to call for, US military intervention in numerous foreign locations. A career political hack of little scientific or engineering expertise, Gaffney promotes EMP as a scare tactic to call for pre-emptive war in his book, ‘War Footing’.

The Center for Security Policy is drawing some of the source of its scare tactics from the EMP Commission which the government funded in 2001. The EMP Commission released a report in 2004, Report of the Commission to Assess the Threat to the United States from Electromagnetic Pulse (EMP) Attack, which actually said that many of the effects can be mitigated, and that recovery from a worst case EMP strike is possible.

Reports by scientists in 2009 stated that much of the effects of EMP or a geomagnetic storm could be mitigated by simply retrofitting a new, relatively inexpensive grounding system to the power transmission lines. As stated in the 2004 report, other components can be redesigned and hardened at manufacture against EMP for as little as a 1% to 3% increase in cost.

Aside from the difficulty of anyone but a well-funded government with developed, strategic missiles or space launch vehicles getting hold of or manufacturing a thermonuclear (fusion) warhead of the size needed (about 1.4 megatons), and then getting it 200 miles above Nebraska (the theoretical blast point to try and EMP the entire continental USA) the effects of EMP are not a guaranteed, universal, permanent ‘lights out’.

The effects over such a wide area are actually quite random, and can vary wildly upon a wide variety of factors such as weather, etc. The effects upon electrical systems are similar to a lightning strike and are just about as unpredictable.

At Kirkland Air Force Base outside of Albuquerque, New Mexico, there is a platform called The Trestle, which is used to test EMP. The late Carl Baum, EMP expert and former Kirtland Air Force Base senior scientist, stated that he thought the effects of EMP are still a huge unknown and need further study.

A geomagnetic storm would have similar effects to the speculated, theoretical effects of an EMP attack. The National Academy of Sciences (NAS) has stated that we have about a 7% chance of having one in the next decade, and the strength may, or may not, be as severe as the well-known ‘Carrington Event’ of 1859. The Carrington Event of 1859 caused some telegraph wires to burst into flame, and even electrocuted a few telegraph operators. Scientists consider the solar super-storm known as the Carrington Event of 1859 to be a once in 500 years event.

Scientists with the NAS have estimated that of the approximately 2,100 major transformers in the USA that are vulnerable to a severe geomagnetic storm, they expect about 365 to be knocked out. Odds are the effects of a worst case EMP attack would be similar, or less intense. So, in a worst case scenario, you are looking at a crippling of the grid, not a permanent obliteration of it.

As for 90% of the population dying within 18 month as a result of the electric grid going down, outside of a Hollywood movie, that is highly unlikely.

How do we know this?

We like to rely upon facts and known examples when we can, not wild speculation or propaganda from neo-con think-tanks run by political hacks who have an agenda. Fortunately, we already have an example of a sudden, unexpected, long term ‘grid down’ situation in a modern city which served as a laboratory for such matters. The city is called, ‘Sarajevo’.

Sarajevo, the capital of Bosnia and Herzegovina and the location of the 1984 Winter Olympics, suffered the longest siege of a capital city in the history of modern warfare. During the Bosnian War, after being initially besieged by the forces of the Yugoslav People’s Army, Sarajevo was besieged by the Army of Republika Srpska from April 5, 1992, to February 29, 1996. The siege lasted three times longer than the Siege of Stalingrad and a year longer than the Siege of Leningrad.

During its 44 month siege, the city was completely cut off for about a year except for NATO air flights. With little or no preparation, the power grid on that modern city went down and stayed down, followed by public utilities and the health care system. Official law and order began breaking down and food shipments stopped, except for air drops that began later by NATO. People often had to crawl under enemy artillery fire to get the air dropped food.

People broke into government armories, and military issue firearms (select fire AK’s, Tokarev ‘TT’ handguns, etc.), with sufficient ammunition to use them, were commonplace in civilian hands. Food and medicine, however, was much harder to obtain, and more valuable, than either guns or ammunition.

Out of an estimated population of 380,000 in the city proper at the time the siege started, the official death toll within the city from the entire 44 month siege was 11,541 dead, mostly civilians, and that includes starvation, disease, lack of health care, rampant crime with a break down of law enforcement, an average of 330 artillery shells per day landing in the city, and sniper attacks. All the while, the grid was totally down for most people in that modern city. That is about a 3% fatality rate.

Humans, as a whole, are a tough and adaptable species, and they do not stay in panic mode indefinitely. They adapt to their situation after a short while, and they then become very survival oriented. These traits are hardwired into all of us. It’s how we as a species have endured so much and yet are still here.

© Plan B Writer’s Alliance – Permission to copy and reprint this article is given so long as reference to the original author and the website http://www.locustsonthehorizon.com are mentioned.

Charlie Monoxide

By Plan B Writer’s Alliance – http://www.LocustsOnTheHorizon.com

(This is an excerpt from the book ‘Locusts on the Horizon‘ from the chapter titled ‘Health, Medicine, & Sanitation’.)

Having pain killers, seriously strong ones, not Tylenol or aspirin, can be very important, especially if surgery is called for. Other grievous injuries could also warrant a high end painkiller, such as when a major fracture needs repair. Those dying from terminal illness will also need something effective to put away the pain.

In a long term situation, the need for this can become acute. Even the Federal government recognizes this, and as part of their planning in the Cold War, they kept an entire grain elevator in Colorado filled with opium poppy seed as part of the USA’s strategic reserve.

Unfortunately, we live in an era of massive drug abuse, and where American law enforcement has gone somewhat mental on trying to keep people away from having high end painkillers.

The result is that unless you have a real prescription and an immediate need for these drugs, obtaining them and storing them as a personal stockpile can be tricky and risky, even if you plan on using them only for legitimate medical purposes.

So, what do people do in the long term, during a prolonged crisis, especially if it is too difficult to stockpile much of these beforehand?

Well, learning hypnosis can be surprisingly effective in many situations. It’s something to seriously look into. Unfortunately, it requires a fair amount of training and practice. There is also the fact that its effectiveness can vary greatly between individuals.

Then, there is also the story of Charlie Monoxide.

This is a true story, and Charlie Monoxide wasn’t his real, legal name, it was his ‘street name’.

Charlie was quite the character, an aging punk rocker covered in tattoos who had been immersed in the hard rock fueled counterculture since the 1970’s. He had seen a lot and done a lot. He had led an interesting life, to say the least.

By the mid-1990’s Charlie had a problem. He was dying slowly of cancer, and it was terminal. Charlie had gotten to the point where he was starting to need a regular supply of serious pain killers, and he knew it was only going to get worse.

Not wanting to spend a fortune on high end, prescription pain killers and not having the fortune to pay for it anyway (or health insurance for that matter), Charlie came up with a very Charlie solution to the situation.

Opting for what he called ‘herbal medicine’, he planted a large garden of opium poppy plants in his back yard. Charlie needed to plant a little extra, because he knew that there would come a point where he wouldn’t be able to garden anymore before he went to the great rock concert in the sky. So, he was planning ahead.

You see, the opium poppy is just a flower, and the seeds can even be bought online. The flowers are actually quite pretty and ornamental. When you see the large flower bulbs, you slice them lightly with a razor blade and collect the milky sap that seeps out of the cut, kind of like a milkweed. That collected sap is opium. It’s rather simple, actually, when you get right down to it.

This is what Charlie was using to cure his pain with. You can process opium to make morphine, which has long been both a powerful medical anesthetic and a powerful painkiller prescribed to terminal cancer patients. However, Charlie just stayed with the original, organic product and it worked well for him.

Things were going smooth, until one day Charlie got into a heated argument with his girlfriend over something inconsequential, as such arguments often are.  She storms off yelling that she is going to call the cops on him for all of his marijuana plants.

Oh yes, Charlie was also growing pot with an indoor growing operation with grow lights….. oops.

So, he calls a buddy who promptly shows up with a large van and hauls off all of the pot plants.

Not long after all of the pot plants are gone, along comes the gallant folks from the Sheriff’s department of Maricopa County, Arizona, who immediately proceed to comb through the house and the property looking for pot plants.

There Charlie was, sitting on his back porch, watching  Sheriff deputies carefully walking amongst the rows of his three hundred opium poppy plants, looking for illegal hemp cultivation. They were quite polite and took great care not to damage the pretty flowers in their nice, neat rows.

Not finding any pot plants, the gallant folks from the Sheriff’s department of Maricopa County, Arizona, began to leave and one of them smiled at Charlie and said, “Hey, those are pretty flowers you have there in your garden.”

Yes, pretty flowers, indeed. Rest in peace, Charlie.

© Plan B Writer’s Alliance – Permission to copy and reprint this article is given so long as reference to the original author and the website http://www.locustsonthehorizon.com are mentioned.